I am writing this post for those who want to upgrade their Blogspot Blog to a custom domain. BigRock is an Indian Domain registrar site, which provides domains in cheap prices, Starting from 99 rupees (INR) per year for .in domain. And a good thing about BigRock is that they accept payments through Debit card.
Personally I've loved BigRock services and haven't faced any problems. I believe BigRock is the best and cheap provider with Debit card support.
Also Read: How to make Emails with BigRock
Personally I've loved BigRock services and haven't faced any problems. I believe BigRock is the best and cheap provider with Debit card support.
Also Read: How to make Emails with BigRock
So if you don't have a Credit card for buying a custom domain through Blogger.com then BigRock is a very good option, Since you can use Debit card for payment.
This Tutorial will teach you How to add your BigRock domain to a Blogspot blog.
I am dividing this Tutorial in 3 steps
- Buying a Domain name
- Configuring Domain
- Adding it to Blogger
Buying a Domain Name
To upgrade your Blogspot blog to a custom domain, First you'll need to get a domain name.
Step 1: Go to bigrock.in
Step 2: Select a Domain name you want
The cheapest domain name you can get is .in (Rs.99/yr), which is best for most indian bloggers and Website owners. But if you want the most popular .com then it is also available in affordable price (Rs.499/yr)
Step 3: Select the duration (eg: 1 year, 5 year)
Now here you may book your domain for a couple of years, Thats you choice. Just choose the duration of domain.
Step 4: Click on Proceed to cart
By clicking this, you'll go through the payment process.
After Clicking this button, you'll be prompt to an offer, Just click on 'No Thanks'
Click on Create an account and fill up the form.
Use this Coupon Code for 10% Discount on Domain.BRA51BR
You have several payment options available, choose what suits you best. But in this Tutorial, I am choosing Debit card as Payment option.
Step 7: Now complete the Payment process and Get your Domain.
Configuring the Domain.
Now that you've bought a domain, Its time to configure it. This process will allow Blogger.com to be your hosting service, Thus saving you Web hosting charges.
Step 1: Go to BigRock.in and Log in to your BigRock account.
Step 4: Click on DNS Management.
Step 6: Click on CNAME Records.
Step 7: Click on Add CNAME Record.
Step 8: Now fill the places with the data.
- Host Name: www
- For Value: ghs.google.com
- TTL: Leave it as it is
Now click on Add Record.
Step 9: After filling CNAME, Click on A Records.
Step 10: Click on Add A Record and Fill the Places.
- Host Name: Leave it blank
- Destination IPv4 Address: 216.239.32.21
- TTL: Leave it as it is.
- Now Click on Add Record.
Step 11: Now Add 3 more A Records.
With the same process as above, Add 3 more A Records using the following data.- Host Name: Leave it Blank for all A Records
- Destination IPv4: Use these IPs for the rest 3 A Records.
Second A Record: 216.239.34.21
Third A Record: 216.239.36.21
Fourth A Record: 216.239.38.21
- TTL: Leave it as it is for all A Records.
Now you have Configured your Domain successfully, Now lets move on to Next Step of Adding Domain to Blogger.
Adding Domain to Blogger
Once you have done the steps above, Its time to add your newly bought Domain to Blogspot Blog.
Step 1: Log in to your Blogger Blog.
Step 2: Go to Settings > Publishing from your Dashboard.
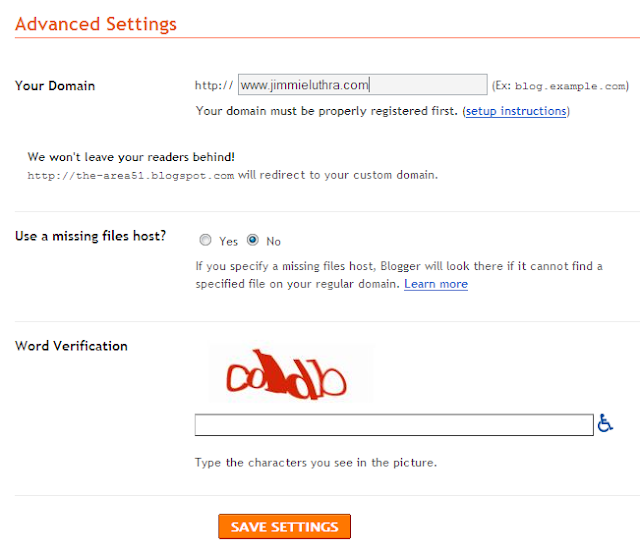
Step 4: Click on 'Switch to Advance Settings
Step 5: Now Enter your full domain name
For Example: www.yoursite.com or www.yoursite.in

Now enter the Word Verification and then Click on Save Settings.
After saving the settings, Click on Redirect to new custom domain and again enter Word verification and then again Click on Save Settings.
With This you've successfully Added your BigRock Domain to your Blogspot Blog.
Things to Remember
Normally It takes about 6-8 hours for your new custom domain to work. Sometimes it may start working within 5 hours.
Sometimes it may take about 48 hrs for your domain to work, If it does not work even after 48 hrs, then it means you have not done the DNS configuration correctly. Switch back to blogspot domain and then Do Step 2 and Step 3 again
(ie: Configuring process and Adding Blog)
If you're still unable to add your custom domain to blogspot blog, Contact BigRock and they'll help you out.
If you have any questions related to this tutorial, Leave a Comment.


Blogger Comment
Facebook Comment